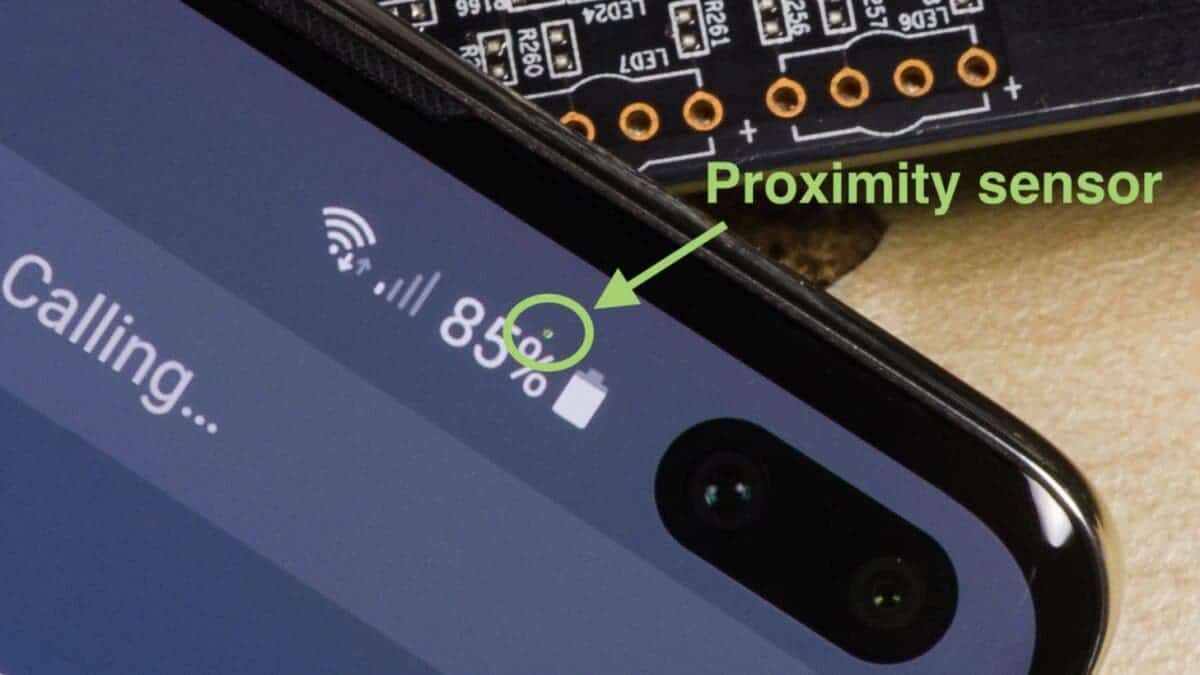
The inconspicuous proximity sensor, a small component nestled inside your smartphone, plays a crucial role in ensuring a seamless calling experience. It detects the proximity of your face during calls, automatically turning off the screen to prevent accidental touches and battery drain. However, a malfunctioning proximity sensor can be a source of frustration, leading to accidental shutdowns and unwanted screen activations.
The Unsung Hero: Understanding and Resetting Your Android’s Proximity Sensor
This article delves into how proximity sensors in Android devices work, explores different sensor technologies, and guides you through the process of resetting them for optimal performance.
Demystifying the proximity sensor
Modern smartphones use a variety of proximity sensor technologies, each with their own advantages and limitations. Here’s a breakdown of the most common types:
- Infrared (IR) sensors: These sensors emit infrared light and detect its reflection when your face comes close to the phone, triggering the screen to turn off. They are a mature and reliable technology, but their effectiveness can be hampered by strong ambient light sources.
- Ultrasonic sensors: These sensors emit high frequency sound waves and measure their echo to determine the proximity of the object. They offer improved accuracy compared to infrared sensors and are less susceptible to interference from ambient light.
- Virtual Proximity Sensors: This software-based approach uses motion sensors and proximity estimation algorithms. Although innovative, their accuracy can be less reliable than dedicated hardware sensors.
Regardless of the underlying technology, a faulty proximity sensor can disrupt your calling experience. Here are some telltale signs:
- Random close: During calls, the screen remains active, allowing your cheek to inadvertently activate the touchscreen and end the call.
- Unwanted screen activation: While listening to voice messages or audio recordings, bringing the phone to your ear triggers the screen to turn on, potentially leading to accidental button presses.
Rebooting the sensors: a potential solution
While a faulty proximity sensor can sometimes be indicative of hardware issues that require professional repair, a simple reset can often resolve software issues or temporary malfunctions. It’s important to note that this approach does not directly “reset” the proximity sensor itself, but rather resets all of the phone’s sensors, effectively refreshing their operation.
Here’s a step-by-step guide to reset your Android device’s sensors:
- Access Settings: Go to your Android phone’s settings menu. This can usually be found by swiping down from the notification bar and tapping the gear icon.
- Find phone information: In the settings menu, find the option for “About phone” or “All about phone”. The exact wording may vary depending on the manufacturer of your device.
- Enable developer options: Tap the entry for “Android version” or “Build number” several times in succession. You will see a notification indicating that developer options are enabled.
- Access the developer menu: Go back to the main settings menu and look for a new tab titled “Developer options” or “System”. This section may be located under Advanced Settings on some devices.
- Search for Disable Sensor: Use the search bar located at the top of the developer options menu. Type “Sensors disabled” and tap the corresponding result.
- Toggling Sensor Deactivation: This will present you with a quick developer settings panel. Find the option labeled “Sensors are disabled” and make sure it is unchecked. By default, it should be unchecked, indicating that all sensors, including proximity, are active.
- Sensor reset complete: You have now successfully reset all the sensors of your phone including the proximity sensor. This process essentially “refreshes” their operation, potentially resolving minor software issues that may have affected the proximity sensor’s performance.

Gizchina News of the week
Limitations and Additional Considerations
It is important to understand that resetting the sensors is not a guaranteed solution to all problems with proximity sensors. In cases where the problem stems from hardware failure, such as a faulty sensor component or a loose connection, professional repair may be necessary. Here are some additional considerations to keep in mind:
- Reset frequency: While there is no harm in resetting the sensors every now and then, avoid doing it too often as it is not a preventative measure. It’s best to perform a reset only when you encounter specific problems with the proximity sensor.
- Alternative solutions: Some phone manufacturers offer built-in diagnostic tools to test sensor functionality. Additionally, there are third-party apps that claim to calibrate proximity sensors, but their effectiveness may vary and may require root access, which may void your device’s warranty.
- Software Updates: Keeping your Android device software up-to-date is crucial. Software updates often include bug fixes and performance improvements that can fix known problems with proximity sensors.
Judgment
The proximity sensor, although a small component, plays an important role in ensuring a smooth calling experience. Understanding the different types of sensors and the process of resetting them gives you the ability to troubleshoot potential problems and maintain optimal phone functionality. By following the steps described above, you can try to restore a malfunctioning proximity sensor on yours Android device. However, if the problem persists after a reset, consider exploring alternative solutions such as diagnostic tools or contacting your device manufacturer for professional assistance. Remember that software updates are also essential to keep the sensor working optimally, so keep your phone’s software up to date.
Beyond the technical aspects, let’s explore the broader implications of a well-functioning proximity sensor. Contributes to:
- Battery efficiency: By automatically turning off the screen during calls, the proximity sensor helps preserve battery life, especially during long calls.
- Usability: A sensitive proximity sensor prevents accidental activation of the screen while using audio functions such as voice messages or listening to music. This ensures a smooth and seamless user experience.
- Call quality: A reliable proximity sensor minimizes the risk of accidental closing, resulting in clearer and more productive conversations.
In conclusion, the proximity sensor, despite its diminutive size, plays a crucial role in improving the calling experience of your smartphone. By understanding its functionality, potential issues and simple reset procedure, you can ensure that this unsung hero continues to run smoothly, allowing you to focus on what really matters – your conversations.
Additional research:
This article provides a basic understanding of proximity sensors in Android devices. If you want to dig deeper, here are some additional avenues to explore:
- Advanced sensor functionality: Some Android devices have advanced touch capabilities. Research your specific phone model to see if it offers features like proximity wake (turning on the screen when you bring the phone to your face) or smart gesture recognition.
- Sensor Comparison: Explore online resources that compare the performance of different proximity sensor technologies. This knowledge can help you make informed decisions when upgrading your smartphone in the future.
- The future of sensor technology: The world of mobile sensors is constantly evolving. Follow industry trends to discover how advances in sensor technology will further enhance the user experience of future smartphones.
By taking the time to understand and care for your smartphone’s proximity sensor, you can ensure it continues to perform its vital role, contributing to a more seamless and enjoyable mobile experience.
Mastering Your Android’s Proximity Sensor: A Guide to Optimal Performance


